06 · Setup & Troubleshooting
Blender Basics
Solutions to the most common issues when using AXIS models in Blender: textures, warnings, performance, and rendering.
Overview
This section provides solutions to the most common issues you may encounter when using the model in Blender. It covers topics such as missing or pink textures, version compatibility warnings, Python script messages, and general performance or rendering problems.
Each topic includes a clear explanation and step-by-step instructions to help you identify the cause and fix it quickly, even if you are not an advanced Blender user.
Following the instructions in this section will help you restore missing textures, enable scripts safely, improve performance, and ensure the model displays and functions as intended.
Package Contents
OMNIA · Cinematic / Realtime
- Blender/
Self-contained .blend file with all textures embedded. - Backup_Files.zip
textures/ with the original texture files.
AXIS_Panel.py as a backup copy of the embedded panel.
VERSA
- .blend
Self-contained file with textures embedded. - Export formats with embedded textures:
FBX · GLB · USDZ - Backup_Files.zip
textures/ with the original texture files.
AXIS_Panel.py as a backup copy of the embedded panel.
OMNIA · Customizable Edition
- Blender/
The .blend file and a textures/ folder containing texture files and PSD templates for customization. PSD files are located inside textures/, alongside the .blend. - Backup_Files.zip
textures/ as a backup copy.
AXIS_Panel.py as a backup copy of the embedded panel.
A license file is included in the root folder (LICENSE_RoyaltyFree.txt or LICENSE_Studio.txt). Please review it to understand the usage rights.
Missing or Pink Textures
If the model appears in bright pink (magenta) after opening the .blend file, it means Blender cannot find the texture files.
Most AXIS models use self-contained .blend files with all textures embedded, so this should not happen under normal circumstances. However, it can occur if the file was manually unpacked, or if an embedded texture was accidentally removed.
For OMNIA Customizable Edition models, textures are linked externally from the textures/ folder located next to the .blend inside Blender/. Pink textures here typically mean that folder was moved or renamed.
To fix it:
- Make sure the textures/ folder is in the same directory as the .blend file and has not been renamed or moved.
- If textures are still missing, relink them manually in Blender:
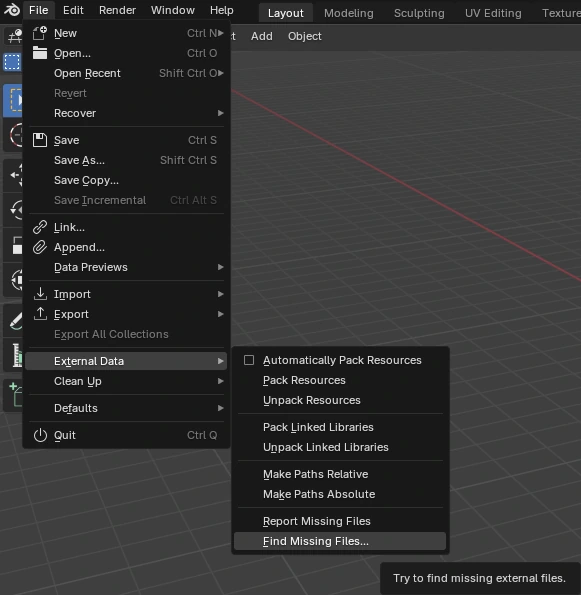
- Go to the top menu: File > External Data > Find Missing Files
- Select the folder where the textures are located
- Blender will automatically relink all missing files
- If needed, you can also restore the original textures from Backup_Files.zip, included in the package root.
Once the textures are found, the materials will return to their normal appearance. This process only needs to be done once, as long as the folder structure remains unchanged.
You can also visit this explanatory video:
UDIM Textures
Some assets (especially full characters) use UDIM textures on certain materials, such as skin or nails.
If the UDIM configuration is modified, Blender may display the same texture tile across the entire model (for example, the head texture repeating over the body).
If this happens, check the following:
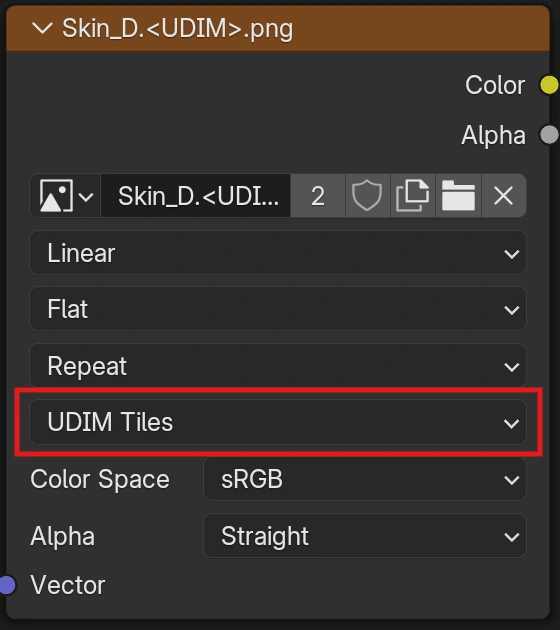
- Open the Shader EditorSelect the affected material (e.g. Skin or Nails).
- Locate the Image Texture nodeFind the node connected to the material.
- Check the texture modeMake sure it is set to UDIM Tiles. If it is set to Single Image, change it back to UDIM Tiles.
Once corrected, Blender will automatically restore the proper texture layout across all UDIM tiles.
Version Compatibility in Blender
All models are usually created using the latest stable version of Blender, but are always made compatible with version 4.0 and up.
All files are tested on their respective compatible versions before being released.
Common Warnings and Messages
When opening the model for the first time, Blender may display some warning messages. These are completely normal and do not indicate any problem with the model.
1. Overwrite file with an older Blender version?
This message appears when the .blend file was created in a newer Blender version than the one you are currently using.
"This file was saved by a newer version of Blender (4.3). Saving it with this Blender (4.0) may cause loss of data."
Solution: Simply click "Save As…" to save a new copy of the file instead of overwriting the original. It is always recommended to use Blender 4.0 or newer.
2. File written by newer Blender binary
This warning appears in the lower status bar and has the same meaning as the previous message.
"File written by newer Blender binary (403.34), expect loss of data!"
Solution: You can safely ignore this warning if you are using Blender 4.0 or later. No actual data will be lost when working within compatible versions.
3. Python script execution disabled
When opening the file, Blender may display a security warning:
"For security reasons, automatic execution of Python scripts in this file was disabled."
This appears because the file includes a Python script (rig_ui.py and AXIS_Panel.py) used to control the interface of the rig.
Solution: Click "Allow Execution" to enable the script. If you want Blender to always allow scripts from this file, check "Permanently allow execution of scripts" before confirming. Alternatively, enable this globally from: Edit > Preferences > Save & Load > Auto Run Python Scripts.


Simplify and Performance
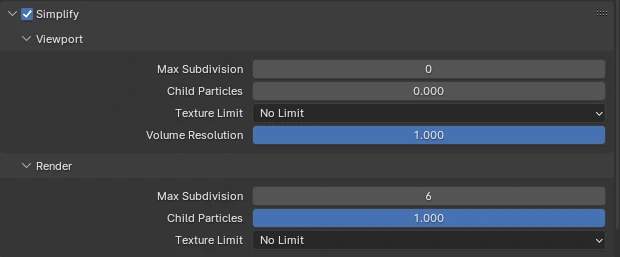
Simplify is a Blender feature designed to reduce scene complexity while working, without affecting the final render quality. It temporarily limits subdivision levels, particle counts, and other heavy elements to improve viewport performance.
In the model, Simplify may be active by default to ensure smooth navigation, especially on systems with limited resources. This does not affect the final render; Blender automatically ignores Simplify when rendering and always displays the full resolution.
To adjust Simplify manually:
- Go to the "Render Properties" tab (camera icon) in the Properties panel.
- Open the "Simplify" section.
- Enable or disable the checkbox to toggle the effect.
- You can adjust the maximum subdivision levels or particle visibility if needed.
In addition, the AXIS Panel includes a dedicated "Performance" section that provides quick access to Simplify and other optimization controls such as hair curve reduction.
Moving and Posing the Model
The model should always be manipulated through its rig, not by selecting or transforming the mesh directly. The geometry is parented and linked to the rig, so moving the mesh manually can break its relationship with the controllers.
To move, rotate, or scale the character correctly:
- Select the main rig object in the scene.
- Use the standard move (G), rotate (R), and scale (S) shortcuts in Object Mode.
- Avoid applying transformations (Ctrl + A) unless absolutely necessary, as this can cause deformation issues in the rig.
Recommended modes of interaction:
- Object Mode: Move, rotate, or position the entire model in the scene.
- Pose Mode: Use this mode to animate or pose the model using its rig controllers. More info.
Final Rendering
The model is ready to render immediately after opening the Blender file. Materials, lighting, and render settings are already configured to match the visual quality shown in the product previews.
Render Engine
- OMNIA assets: each edition is preconfigured for its intended render engine:
- Cinematic and Customizable editions use Cycles for maximum realism.
- Realtime editions use Eevee, optimized for performance and interactive rendering.
- VERSA assets: VERSA models are configured to render in Cycles by default, providing consistent, physically based results.
Using a different render engine may change the appearance of shadows, reflections, or skin shading, especially in materials that rely on subsurface scattering or transparency.
Lighting
A sample HDRI is included in the scene for lighting reference. Proper credit is provided to Poly Haven. You are free to replace the HDRI or adjust its intensity according to your artistic needs.
Render Settings
You may modify render settings such as resolution, sampling, and denoising to better match your hardware or production requirements. The default configuration is already tuned to provide a balanced and realistic result without requiring additional setup.
Want to learn more about Blender?
The official Blender documentation covers every feature in depth.