05 · Customization
Customizable Editions
Advanced material system for skin tones, tattoos, and nail customization. Non-destructive and fully editable in Blender.
Overview
The Customizable Edition provides an advanced material system that allows full visual personalization of the arms, including skin, tattoos, and nails. Designed for users who want to add their own tattoos, create custom nail designs, or adjust skin tones while keeping the original materials intact.
This edition uses layered shader controls and external templates that can be edited in any PSD-compatible editor: Adobe Photoshop, Affinity Photo, or GIMP. These templates act as visual guides to place artwork accurately on the 3D model.
The customization process is completely non-destructive. Adjustments, texture updates, and real-time previews are all possible inside Blender without altering the geometry or base setup.
- Adding tattoos, decals, or graphics directly onto the arm surface.
- Customizing each nail individually with colors or unique designs.
- Switching between natural or painted nail appearances.
- Modifying the skin tone, brightness, hue, and realism parameters.
- Combining all visual options freely while preserving the original shading.
Video Tutorial
Arm Customization: Skin Tone
Custom Skin Tone
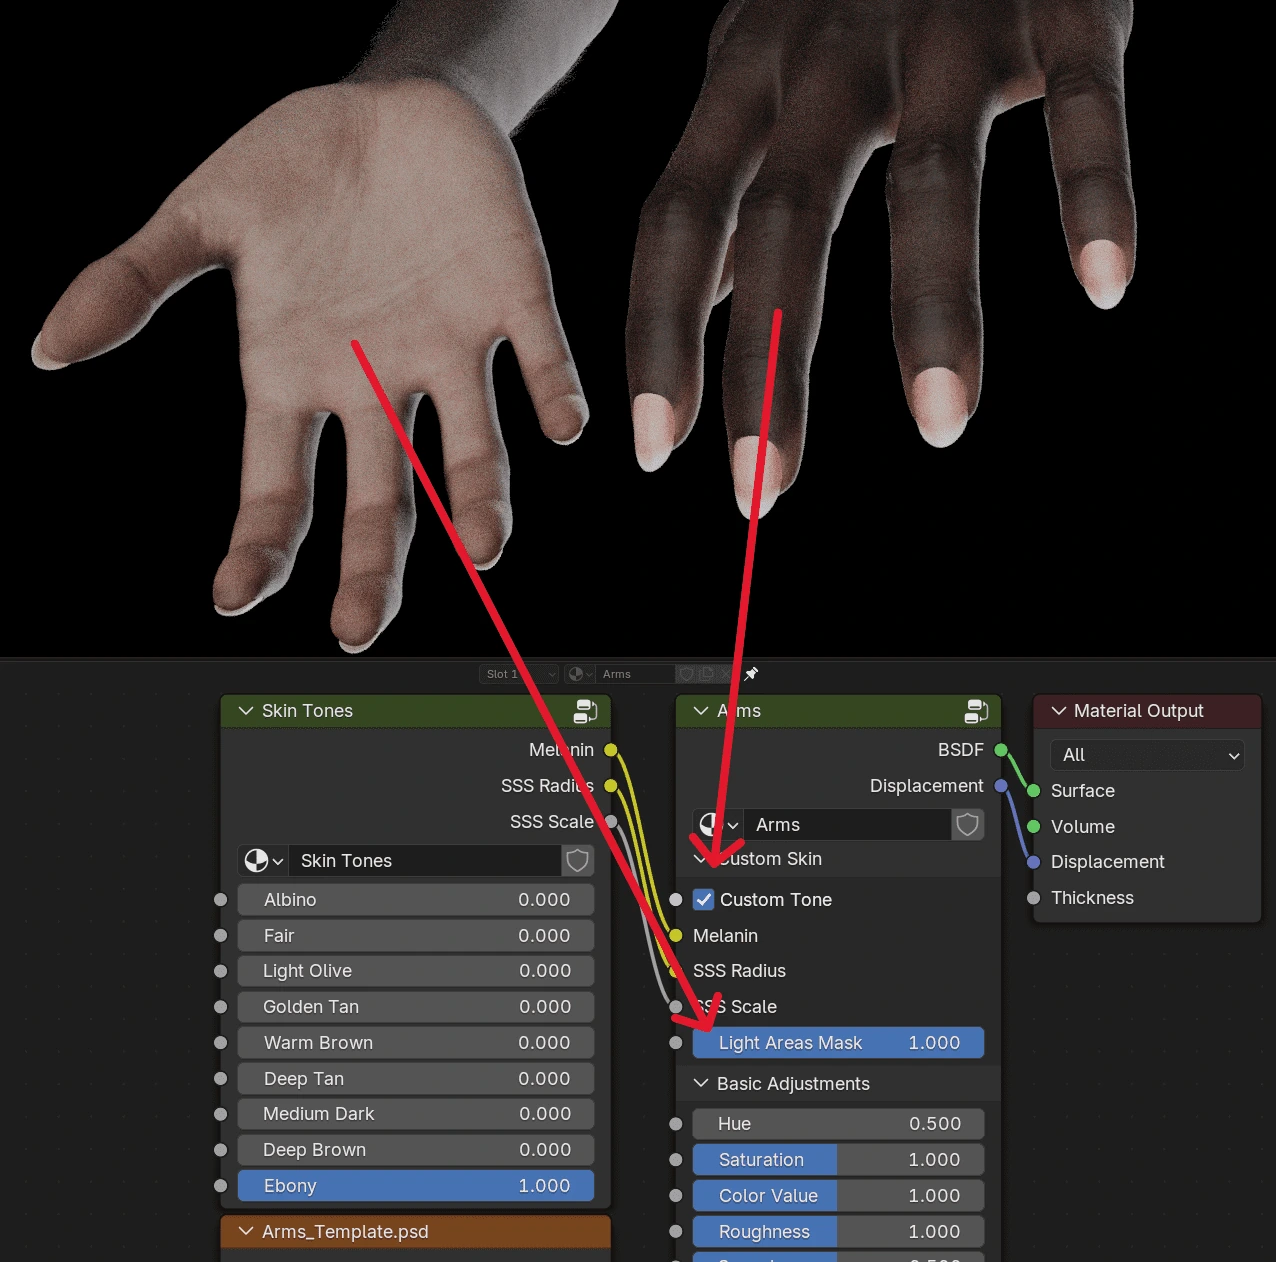
Open the Shader Editor in Blender, locate the Arms material, and enable the Custom Tone option. In the Skin Tones node, choose a preset:
Albino · Fair · Light Olive · Golden Tan · Warm Brown · Deep Tan · Medium Dark · Deep Brown · Ebony
Each tone adjusts the melanin and subsurface parameters to achieve a natural result.
Light Areas Mask
Controls the visibility of lighter skin zones typical in darker complexions: palms, knuckles, and finger edges. Increasing this value enhances the contrast between these regions and the rest of the skin.
Basic Adjustments
General visual controls for fine-tuning the selected skin tone.
- HueShifts the overall hue. Useful to slightly warm up or cool down the tone.
- SaturationIncreases or reduces color intensity. Lower values create a more desaturated or pale appearance.
- Color ValueAdjusts brightness. Increasing makes the skin lighter; decreasing darkens the overall tone.
- RoughnessControls glossiness. Lower values make the skin shinier; higher values produce a softer matte surface.
- SpecularAmount of reflected light. Balance the highlights depending on your lighting setup.
- Subsurface ScaleScattering depth of the subsurface layer, keeping the skin looking realistic under different lights.
- SubdermisColor control for the lower layer of the skin. Subtly modifies the warmth or tone of the underlying tissue.
- DisplacementAdds depth and surface relief to skin microdetails. Moderate values are recommended.

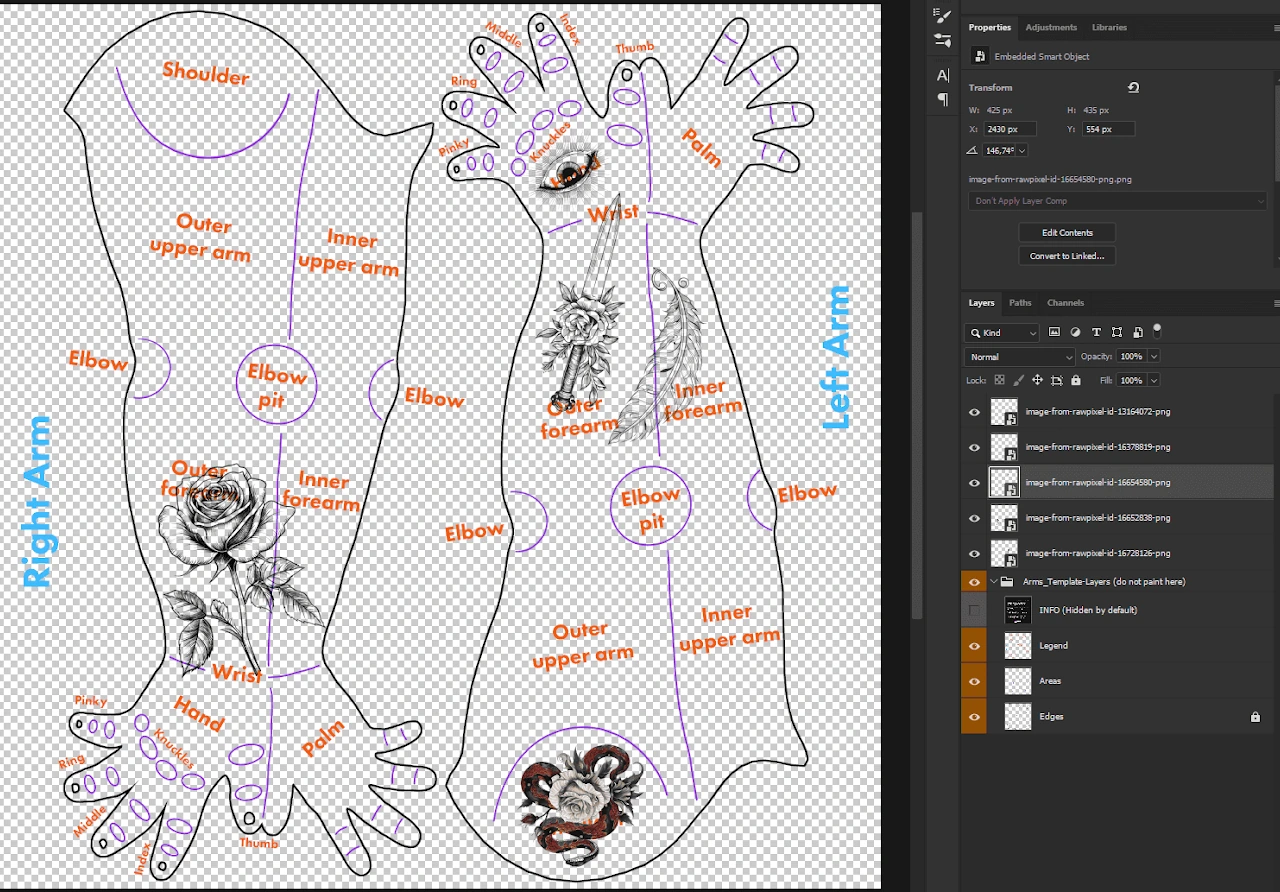
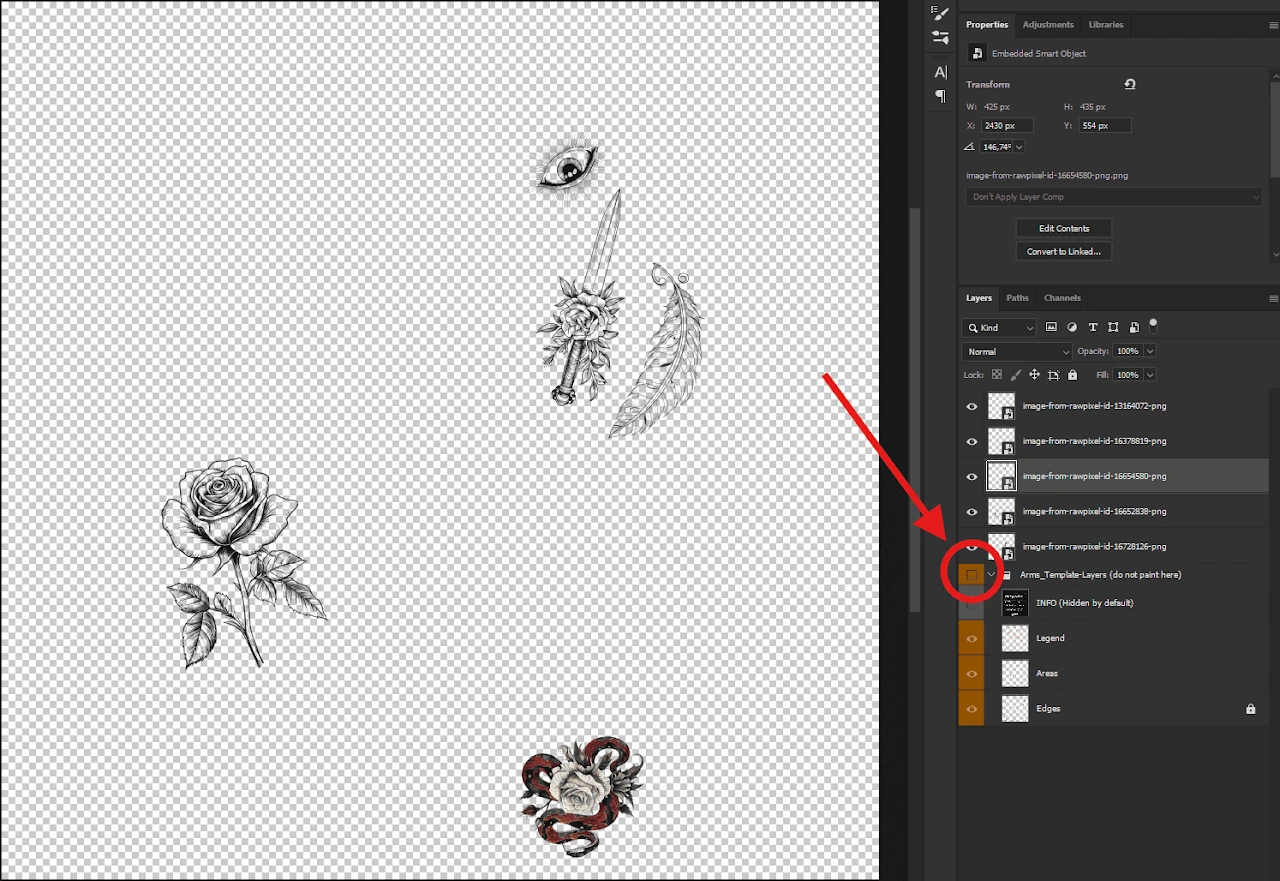
Tattoo Template
Inside the main textures folder of the model you will find Arms_Template.psd. This file must remain in the same directory where the .blend file was unpacked, as Blender uses relative paths to locate textures.
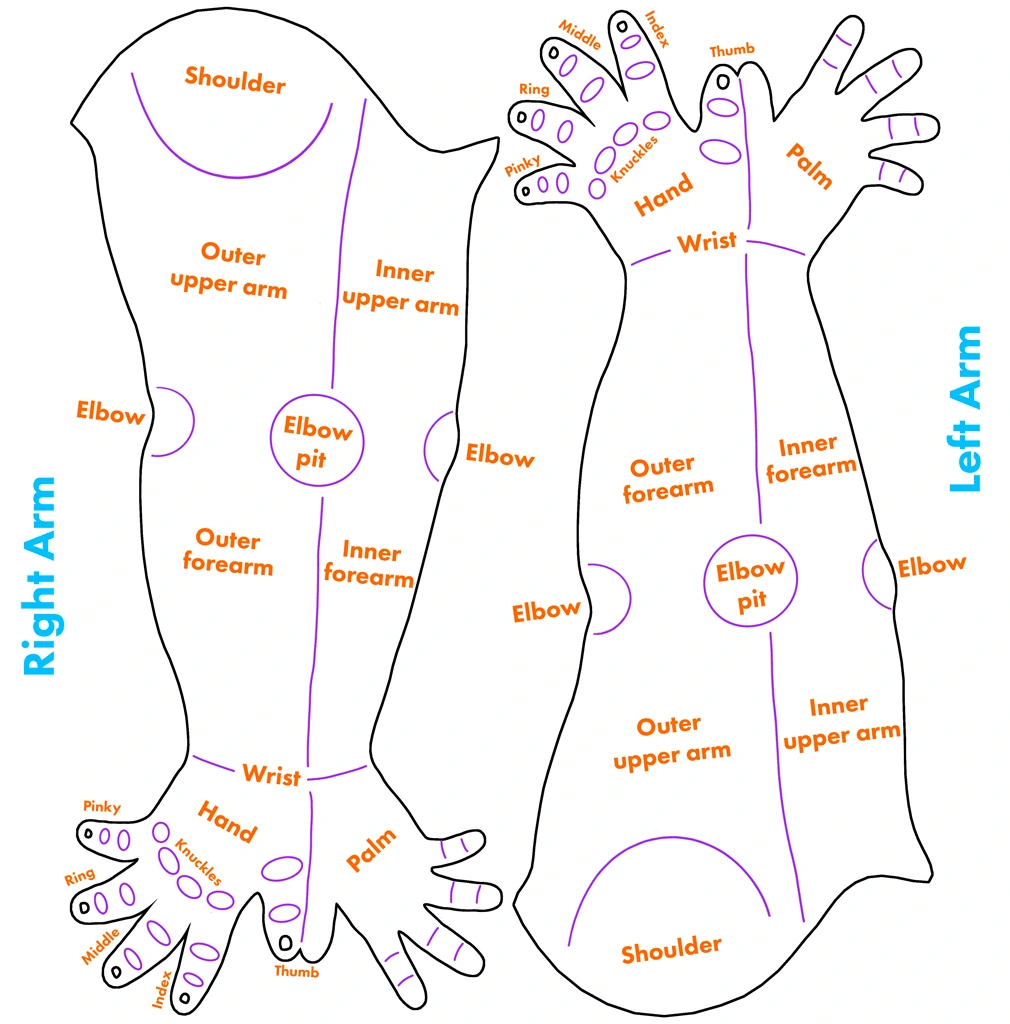
The template provides a complete 2D layout of both arms with orientation guides, including front and back areas, shoulders, elbows, wrists, hands, and fingers.
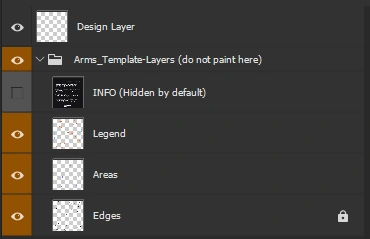
Layer Structure
- Design LayerEmpty layer at the top for your artwork. Add additional layers above this one for separate designs.
- Arms_Template-LayersInternal reference layers; do not modify or paint over these.
- INFO (hidden)Extra usage information. Enable it for a quick reference inside your editor.
- LegendNames and orientation of each arm section: "Outer forearm", "Elbow pit", "Palm", etc.
- AreasMarks specific body part regions for precise placement of small details.
- EdgesDefines the visible limits of the texture. Keep designs within these boundaries to avoid stretching or seams.
Above the folder Arms_Template-Layers you can freely add new layers with your custom tattoo designs. Keeping this structure ensures the visual guides remain intact and your artwork stays organized.
Applying Tattoos
- Open
Arms_Template.psdfrom the textures folder. - Add your tattoo images on new layers above Arms_Template-Layers.
- Place each design in the desired area using the guide layout.
- Hide the guide folder so only your artwork remains visible.
- Save with File > Save (Ctrl+S). The PSD must stay in the same folder.
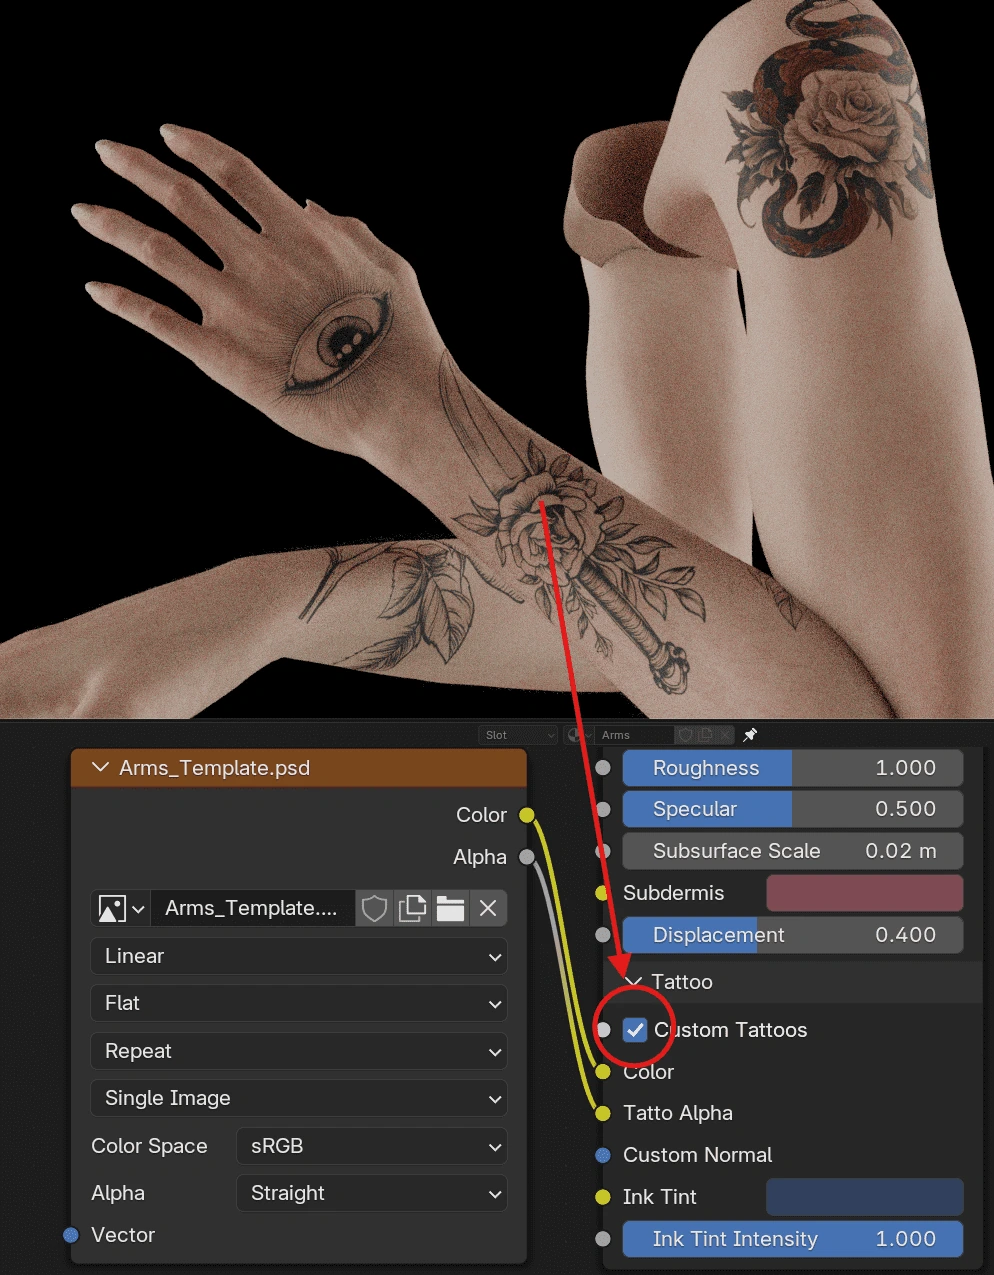
- In Blender, open the Shader Editor, locate the Arms material, and enable Custom Tattoos.
Tattoo Section Controls
- Custom NormalOptional normal or bump map input. Adds surface relief to the tattoo, useful for raised ink, engraved lines, or scars. If disconnected, the tattoo appears flat.
- Ink TintApplies a color tint to the tattoo layer for a natural or slightly aged look. Adjust color and strength to simulate ink tones or fading.
Nail Customization
General Values
Basic controls that affect the overall appearance of the nails, whether painted or natural.
- RoughnessControls how smooth or matte the nail surface appears. Lower = glossier.
- SpecularAmount of reflected light and highlight strength.
- CoatAdds a reflective layer on top. Simulates a clear coat effect similar to polished nails.
- Coat RoughnessControls the roughness of the clear coat. Lower = sharper reflection.
Natural Nails
Controls for the unpainted state, designed to match real nail tone and light behavior.
- HueShifts the general hue to warmer or cooler tones.
- SaturationColor intensity. Lower values desaturate the nail.
- Color ValueOverall brightness of the nail surface.
- Subsurface WeightStrength of the subsurface scattering, simulating soft light transmission.
- Subsurface ScaleDepth of the scattering layer. Higher values add realism under strong lighting.
- TranslucentHow much light passes through the nail edges. Enhances realism in close-ups or backlit scenes.
- Normal StrengthInfluence of surface detail, making small imperfections more visible.
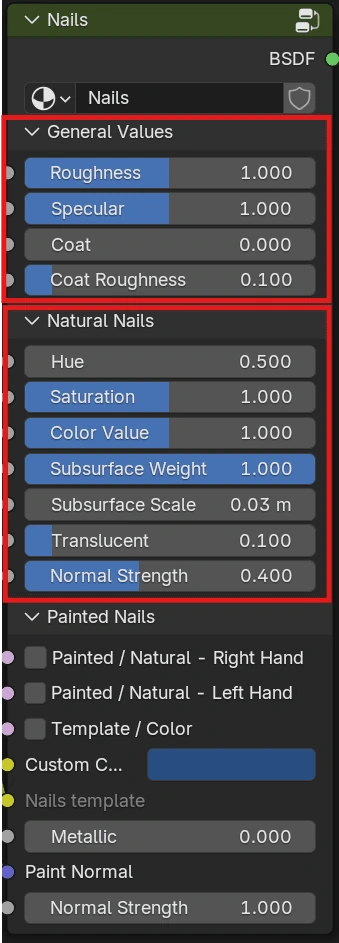
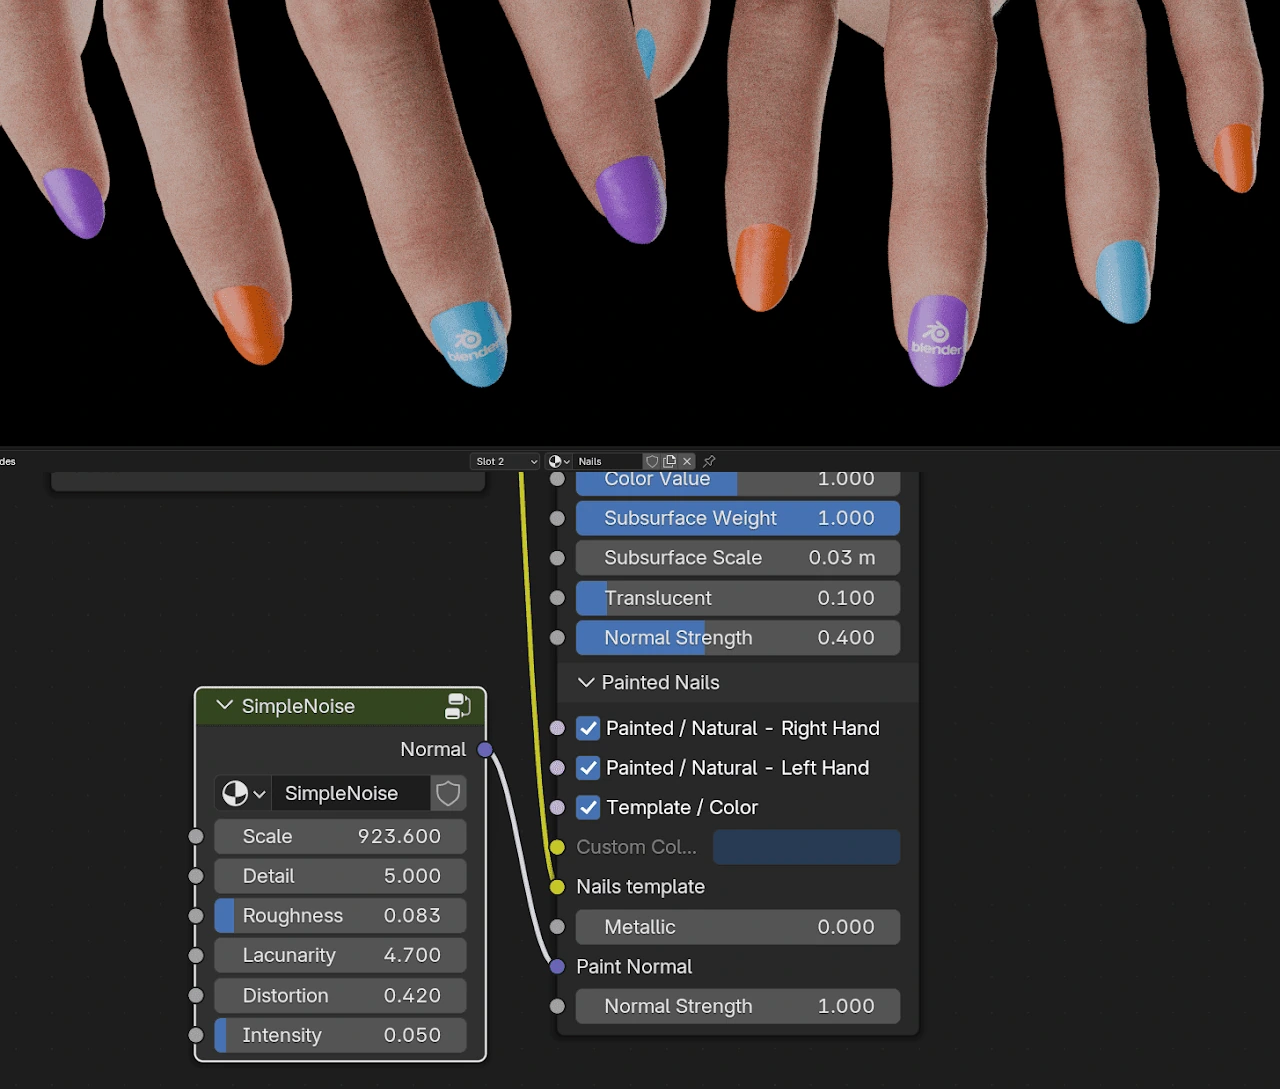
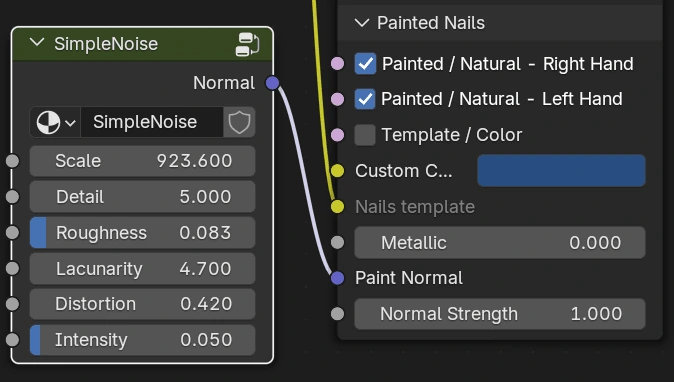
Painted Nails
All controls for customizing painted or decorated nails. Parameters are independent for each hand.
- Painted / Natural (R/L)Activates or deactivates painted nail mode per hand. Both hands can be set independently.
- Template / ColorWhen disabled, nails use a uniform color. When enabled, uses
Nails_Template.psdfor per-nail designs. - Custom ColorSolid color used when Template / Color is disabled.
- MetallicAdds metallic reflection to the paint. Produces chrome or metallic nail polish effects.
- Paint NormalNormal or bump map for the paint. By default connected to an internal noise texture simulating nail polish irregularities.
- Normal StrengthIntensity of the normal/bump detail on the nail surface.
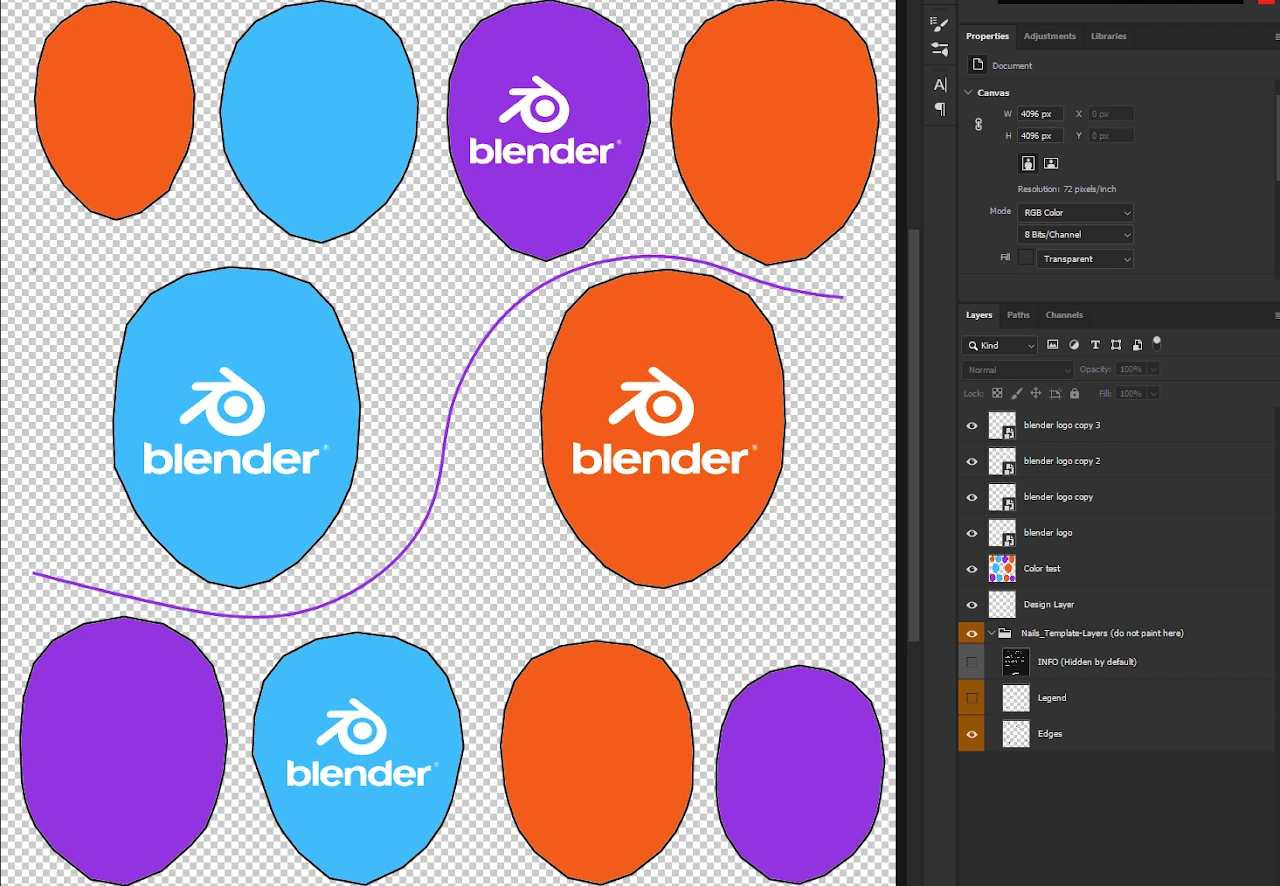
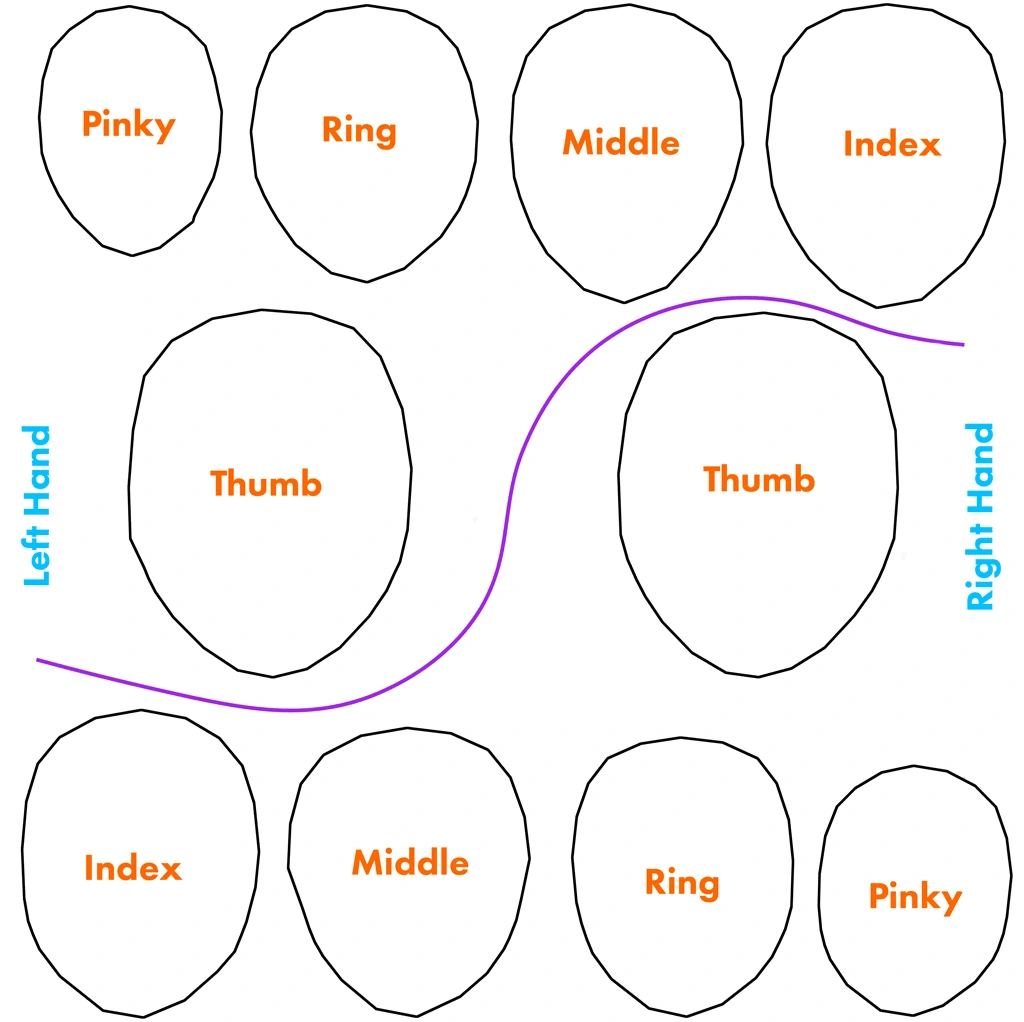
Nails Template
Inside the textures folder you will find Nails_Template.psd. This file must remain in the original textures directory next to the .blend file.
The layout clearly separates the nails of both hands, labeled by finger (Thumb, Index, Middle, Ring, Pinky) for easy identification and precise placement.
When opened in a PSD-compatible editor you will find guide layers: Design Layer, INFO, Legend, and Edges, which serve as visual references for orientation and boundaries.
You can freely add your own artwork or color layers above the existing structure to create personalized nail designs for each finger.
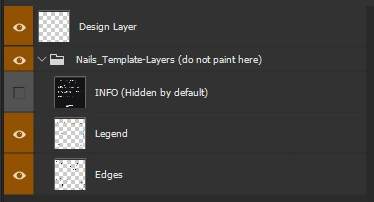
Applying Nail Designs
- Open
Nails_Template.psdfrom the textures folder. - Add your colors, patterns, or logos on new layers above the existing structure.
- Hide the guide folder Nails_Template-Layers (do not paint here) so only your artwork is visible.
- Save with File > Save (Ctrl+S).
- In Blender, open the Shader Editor, go to the Nails material, enable Painted / Natural for each hand, and enable Template / Color.